Note: This feature is exclusively available to curators.
Effortlessly compile your press review(s) and distribute them to your readers.
Unlike Live Feeds, newsletters are a snapshot in time and are not updated automatically.
A newsletter can be either a one-time occurrence or recurrent (daily, weekly, etc.). A newsletter is built using the content from your labels. It is therefore important to label the desired articles first so that you can use those labels in the newsletter.
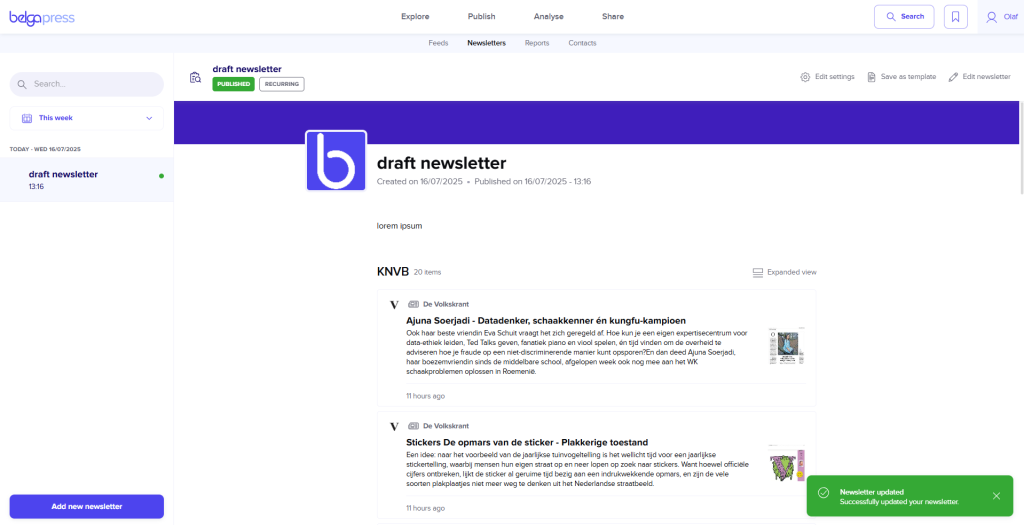
By using a template, you can quickly define fixed categories or insert new ones on a daily basis. Each category is then populated with the articles you have selected. Add an introductory text and publish immediately or at your preferred time. Your target audience will receive an email, styled in your branding, containing the included items along with a link to the platform. The press review is also instantly available in the kiosk or via the native app.
Managing your readers is entirely up to you. Our contacts module allows you to easily manage all your readers and organize them into contact lists that can also be used throughout other parts of the platform.
Furthermore, we offer an additional set of layout options to transform your press review into a true newsletter. These features include inserting quotes, highlighting specific articles, adding individual comments to each article, and including links to your live feeds.
Add new newsletter
Navigate to Publish > Newsletters. To add a new newsletter, you will follow a step-by-step wizard. If you opt for a recurrent newsletter during this process, it will be automatically prepared for you.
The left sidebar displays all newsletters and their current status. You can use the search bar and date picker to find a specific newsletter.
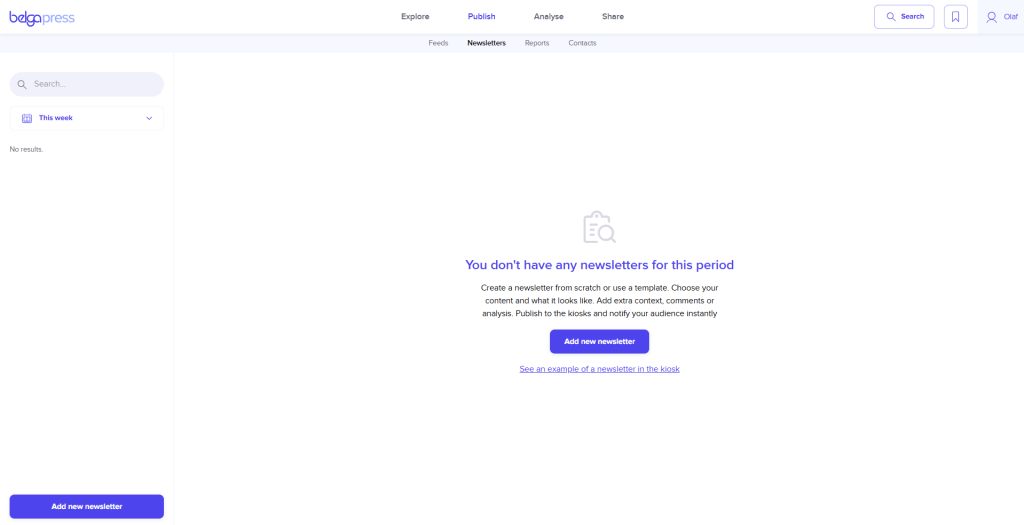
Click ‘Add new newsletter’ to launch the wizard.
Create newsletter
There are two ways to create a newsletter.
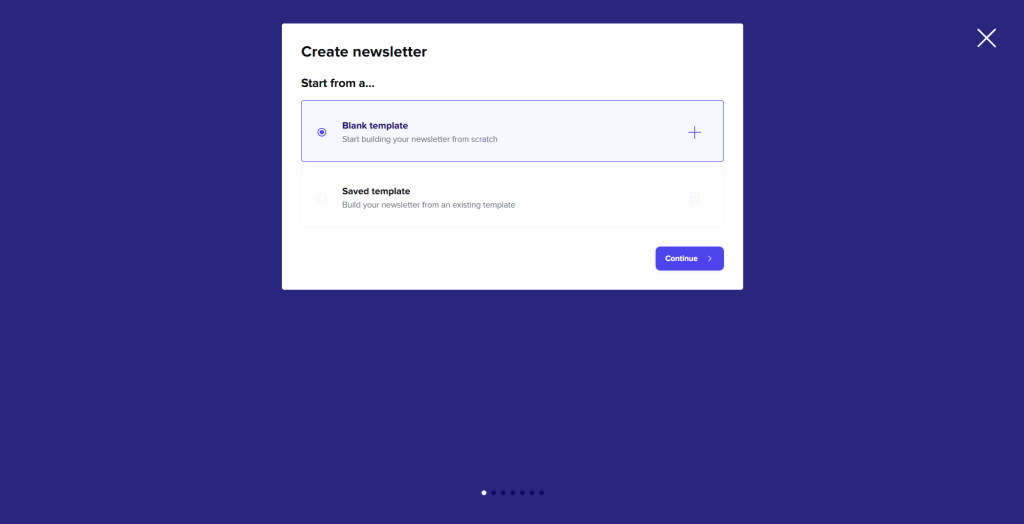
1. Blank template
With this option, you build a newsletter from scratch.
2. Saved template
This method allows you to start from a previously saved template. Simply select the template you wish to use; the only remaining step is to select the appropriate articles.

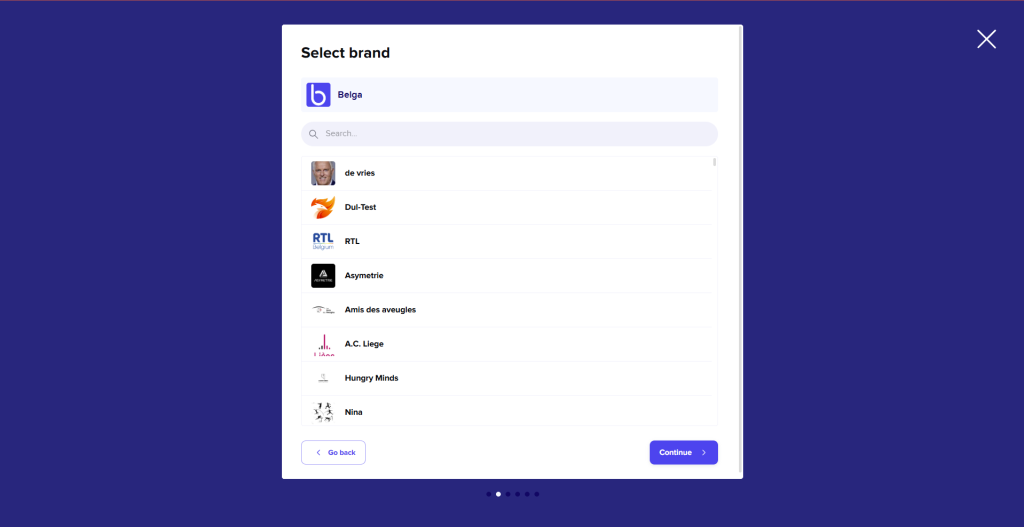
Select brand
Select the logo you wish to add to your newsletter from your previously uploaded brands. You can manage your brands via ‘Settings’.
Collaboration settings
Here you can add colleagues to collaborate on the newsletter with you. You can add multiple colleagues. If you select “Only I can view and edit this newsletter,” the newsletter will remain private.
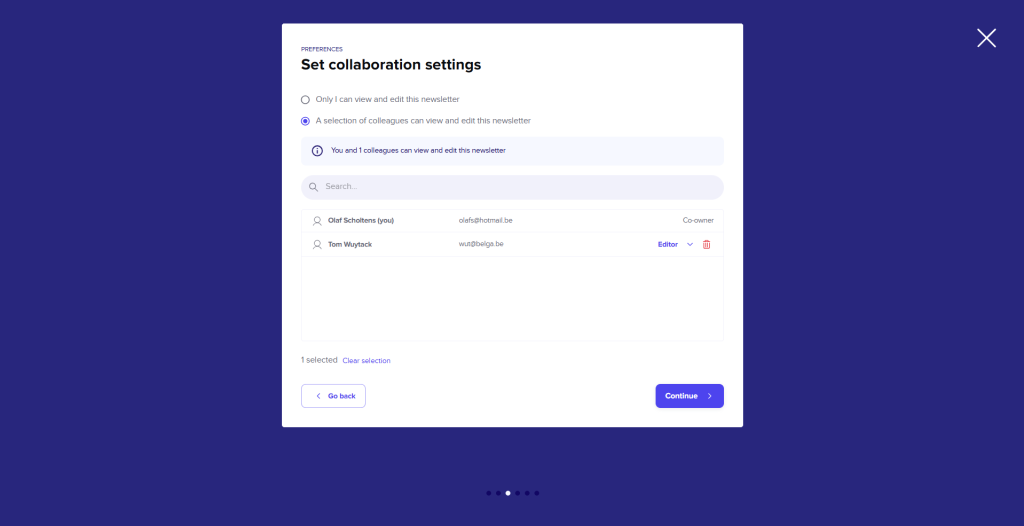
There are two possible forms of collaboration:
- Editor: Editors can view, use, and edit the newsletter, but they cannot delete it or add other editors or co-owners.
- Co-owner: Co-owners can view, use, edit, and delete the newsletter, and they have the authority to add other editors or co-owners.
PLEASE NOTE!
Only users with the newsletter feature enabled can view and use shared newsletters.
If the owner deletes the newsletter, it will be removed for everyone.
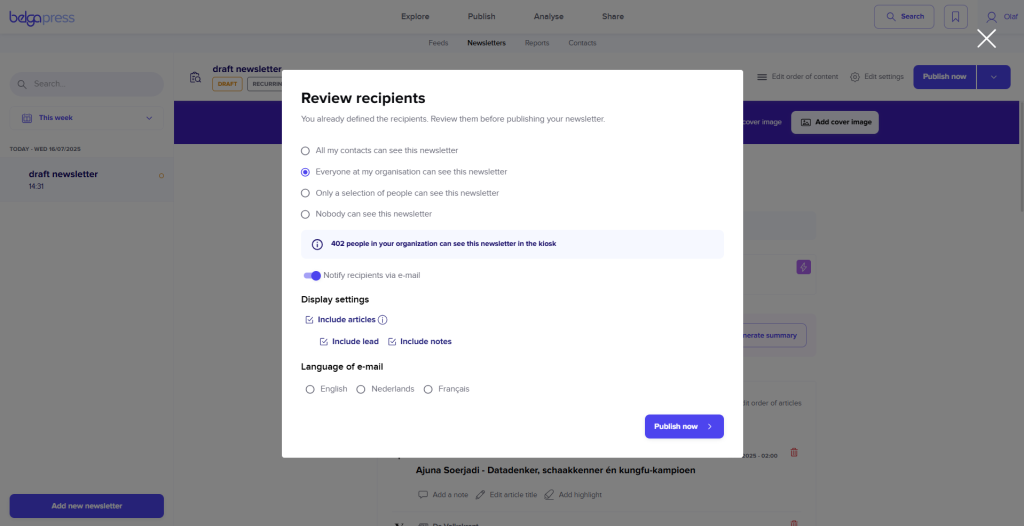
Select your publish options
This is where you indicate to whom you want to publish the newsletter. After publication, these recipients will find the newsletter in the Newsletters section of the Kiosk. As with Live Feeds, there are four possibilities.
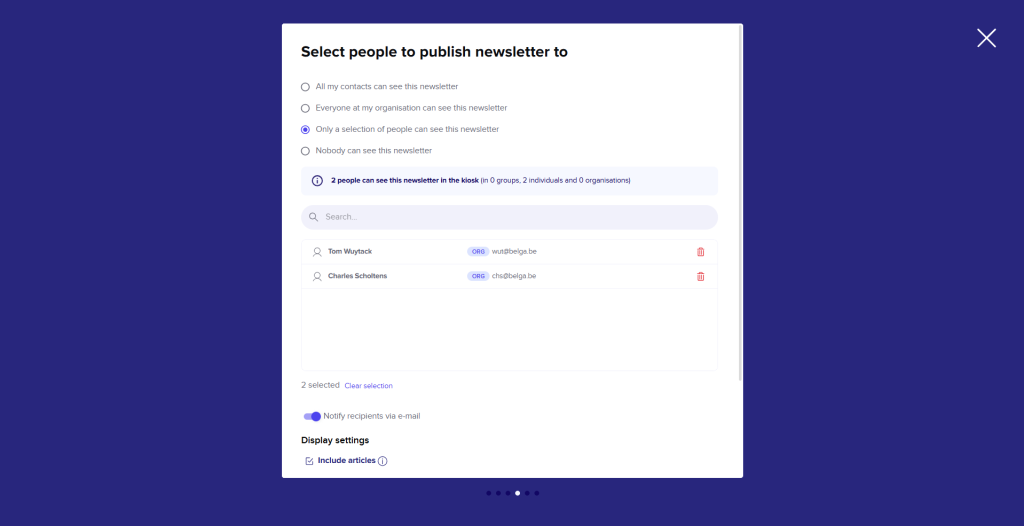
- All my contacts: All your contacts can view the newsletter.
- Everyone: Everyone within your organization can view the newsletter.
- Selection of people: Use the search bar to choose from all your contacts (members of your organization and contacts added via contact management) and manually select the recipients. You can also select contact groups you have created. By using contact groups, you avoid having to select recipients individually every time. (Contact groups are created in Settings under Contact Management). By default, we automatically create an ‘organization group’ for you. This is useful if you want to add specific external individuals in addition to everyone within your own organization. If another organization adds you as an administrator of a different contact group, you will find it here as well.
- Nobody: No one receives the newsletter. This option can be used to test the tool or to prepare a new template.
The blue info bar indicates exactly how many individuals and groups will be reached by the newsletter upon publication.
At the bottom of this section, you can immediately choose whether you wish to notify your recipients by email when the newsletter is published. If so, you can also opt to include a summary of each article and select the language for the template.
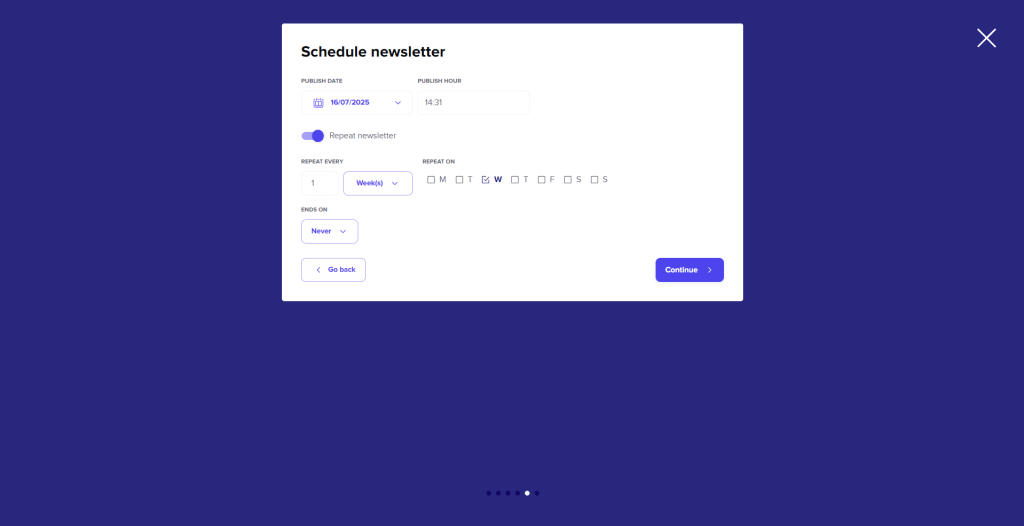
Schedule newsletter
Select when you would like your newsletter to be published. You can choose both the date and the time. By default, the publication time is set to two hours ahead and the newsletter is set to recurrent. Please review this carefully and adjust where necessary! If you wish to send the newsletter only once, disable the ‘repeat newsletter’ feature.
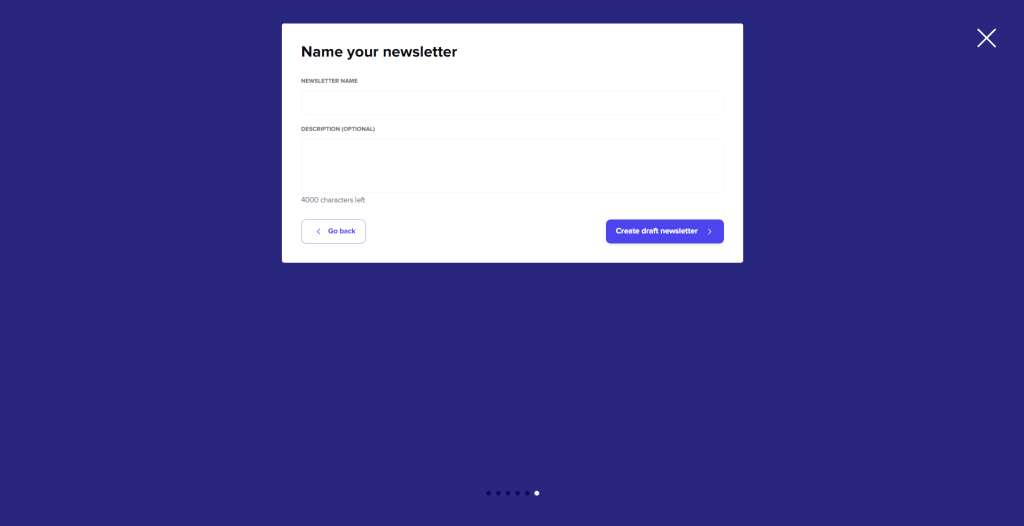
Name your newsletter
Assign a name to the newsletter. This will serve as the newsletter’s title. You can also add an optional description. This is a general (plain text) description for your newsletter and will be displayed at the top. Click ‘Create draft newsletter’ to complete the wizard.
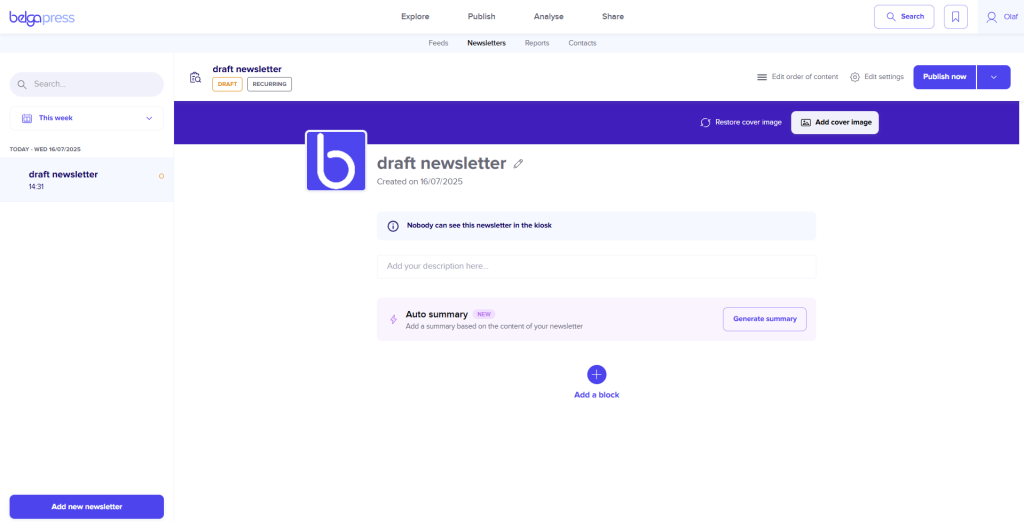
Newsletter functionalities
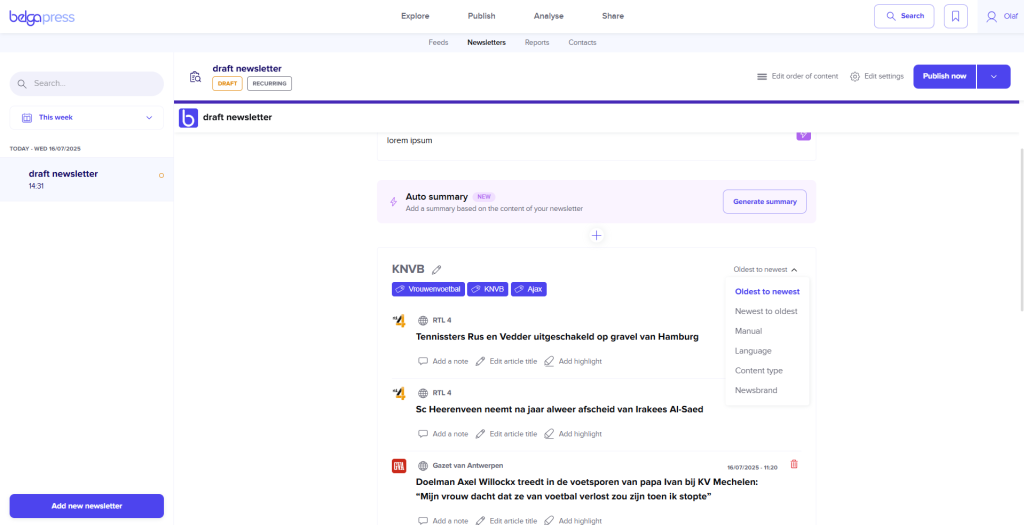
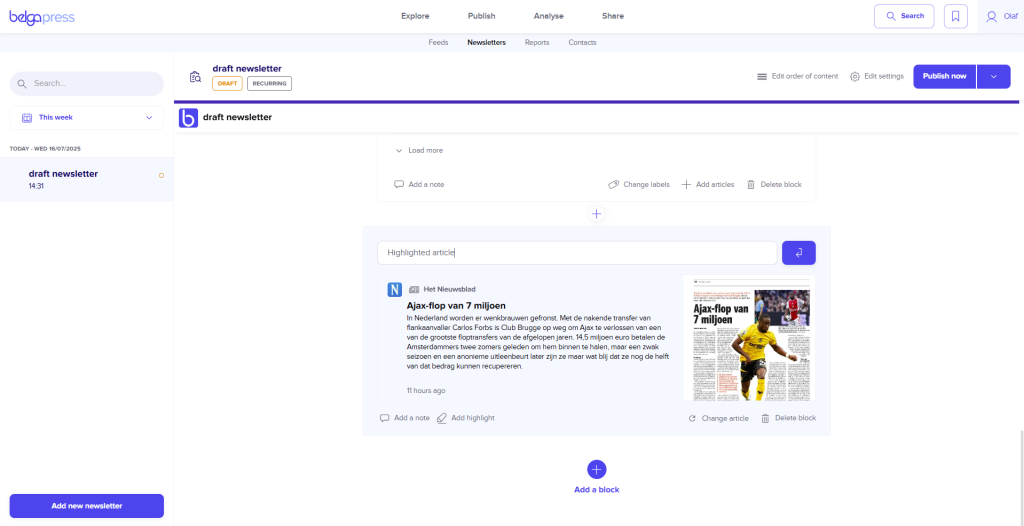
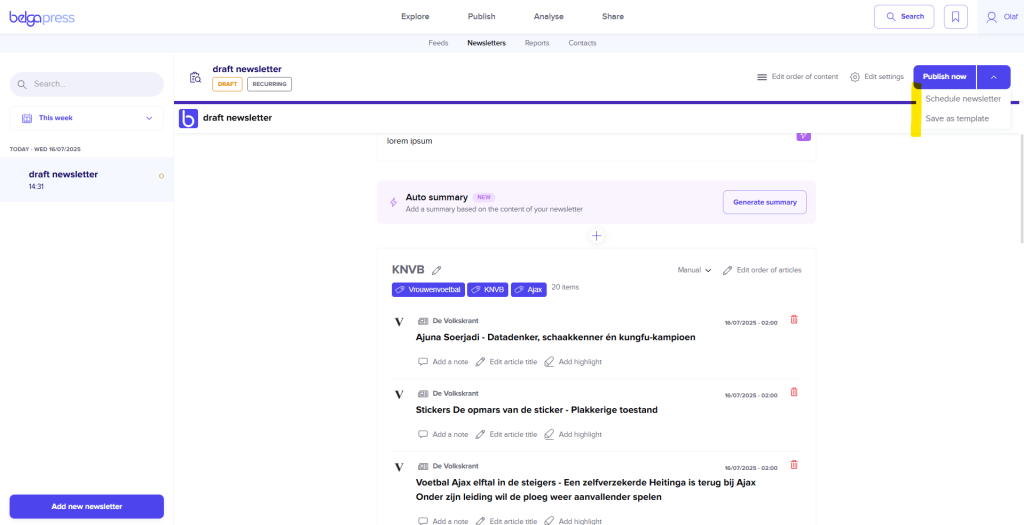
Newsletters are built using content blocks. You can add a block by clicking the “+” icon.

Heading
A Heading is a title that you can add. Headings allow you to group multiple article blocks under a general title.
(Note: Each article block also has its own title.)
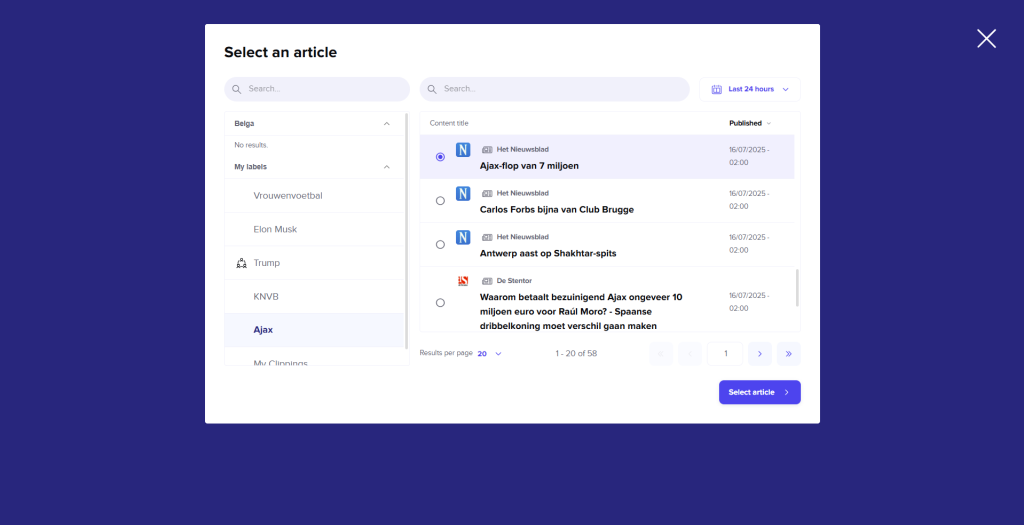
List of articles
This allows you to create blocks of articles based on labels. These article blocks serve as the chapters into which your newsletter is divided. You can add multiple article blocks. Select the labels you want to use to pull articles into your newsletter. You can select multiple labels per block.
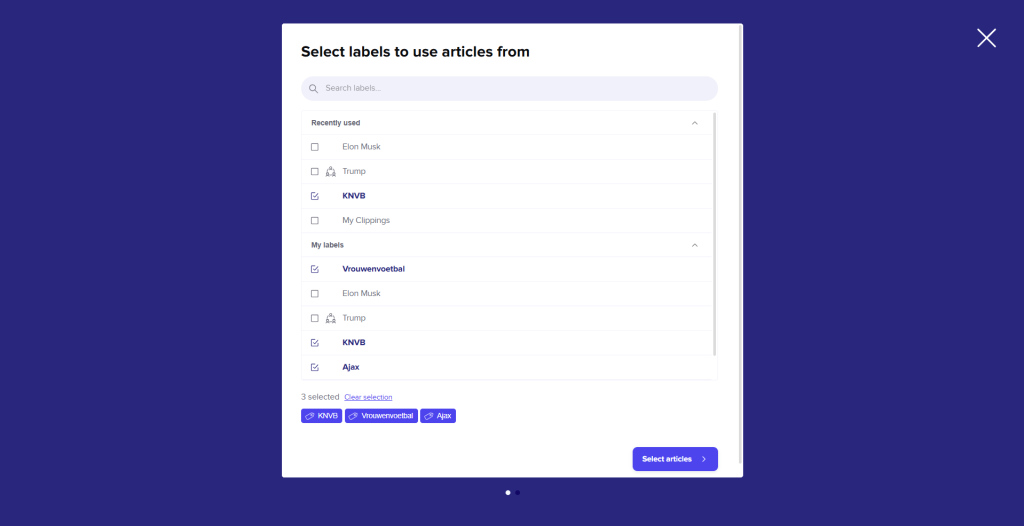
In the next step, you will see a list of articles within the selected labels. Use the date picker to select the period from which you want to choose articles. You can also use the search bar to find a specific article within a label.
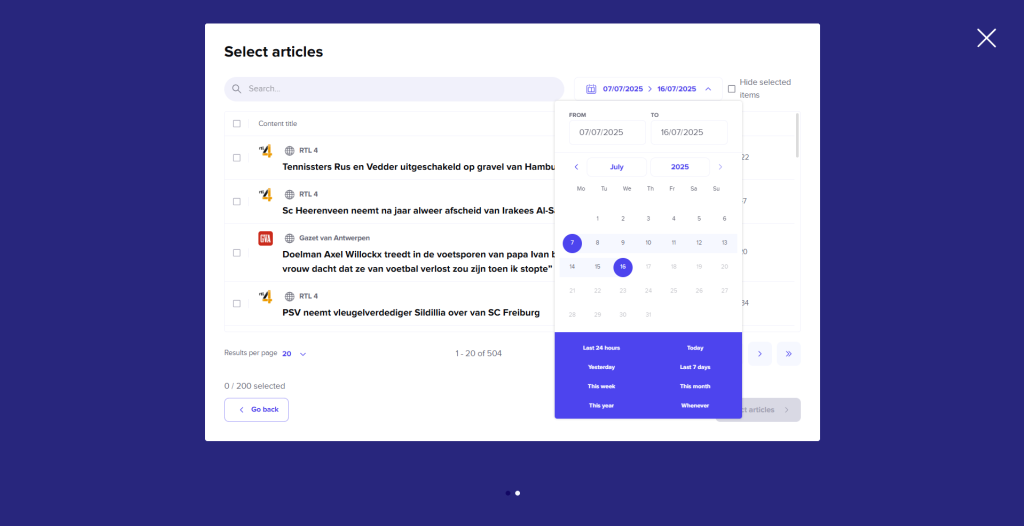
You can select articles by clicking the checkbox. You may select up to 100 articles per block. At the bottom, you can see the total number of articles you have currently selected. Clicking on an article will open the article details. Once you have selected all the desired articles, click “Create label summary.”
By default, the article block is named after one of the labels. You can change this name by clicking the pencil icon.
Add a note to an article or block by clicking “Add note.”
Remove articles from a block by clicking the trash can icon next to the article.
Add additional articles by clicking “Add articles.” This will open the article selection pop-up.
Add or remove additional labels for article selection by clicking “Change labels.”
You have several sorting options for the articles within a block.
- Old to new.
- New to old.
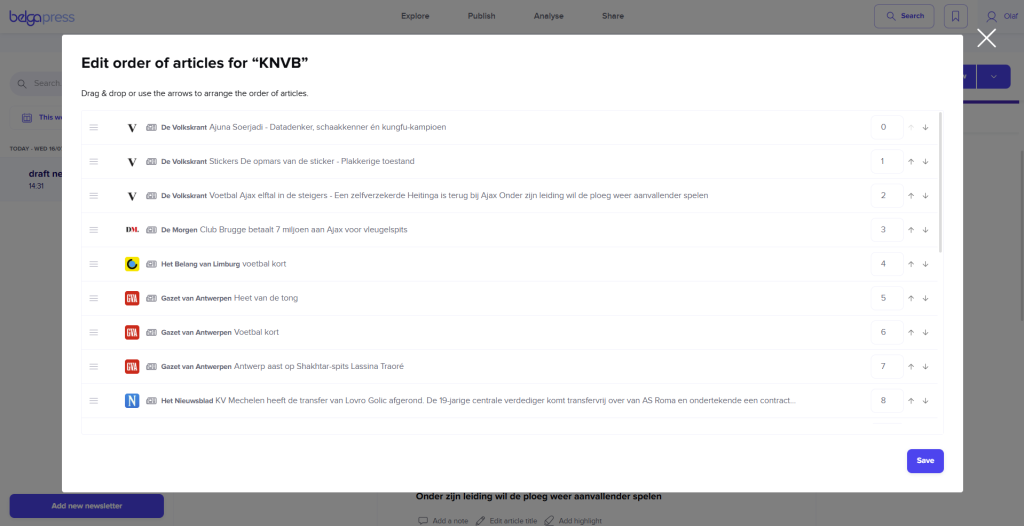
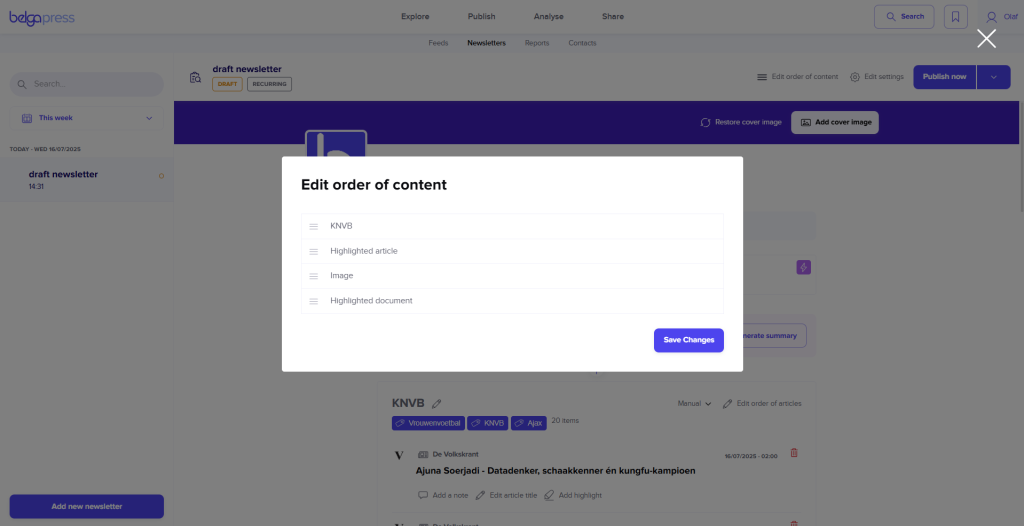
- Manual: You can determine the order of the articles via “Edit order of articles.” You can adjust the numbering, drag and drop the articles with your mouse, or use the arrows to move the articles up or down.
- Language: You can determine the language order via “Edit order of language.”
- Content type: You can determine the order of the different content types via “Edit order of content types.”
- News Brand: Use “News brands” to determine the order by publication (alphabetically from A to Z).
Use “Delete block” to remove an entire block.
Article
Add an article that you would like to highlight in the newsletter. This block can only contain one article. You can choose an article from any of your labels. Just as with a list of articles, you can rename this block and add a note.
HTML
The HTML block is an HTML text editor. Use this tool to add structured information or context to your newsletter. Within this editor, you can:
- Use headings.
- Format text as bold, italic, underlined, or strikethrough.
- Add numbered or bulleted lists.
- Insert hyperlinks to websites.
Image
Use this section to add your own images to your newsletter. Upload your image and confirm to save.
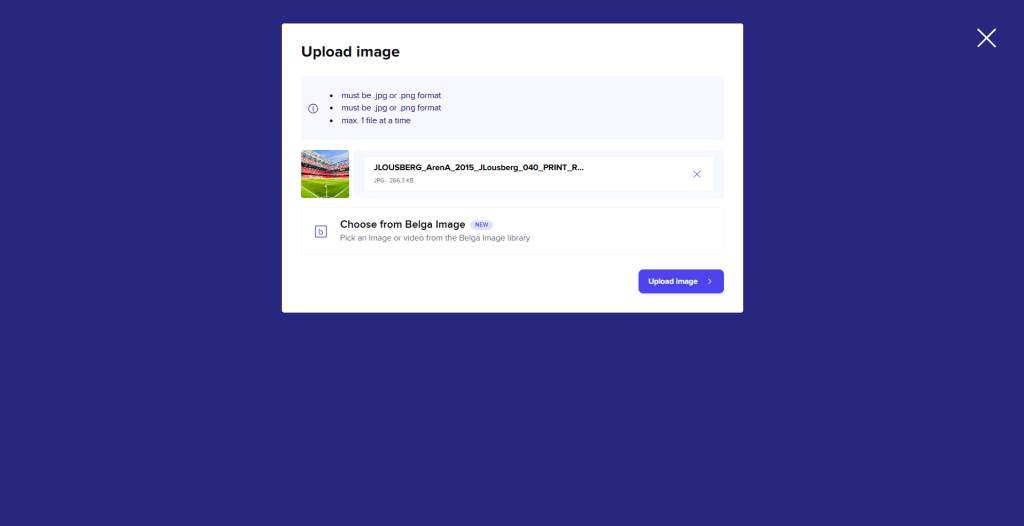
Once available, you have the option to add a caption, replace the image, or remove the block completely.
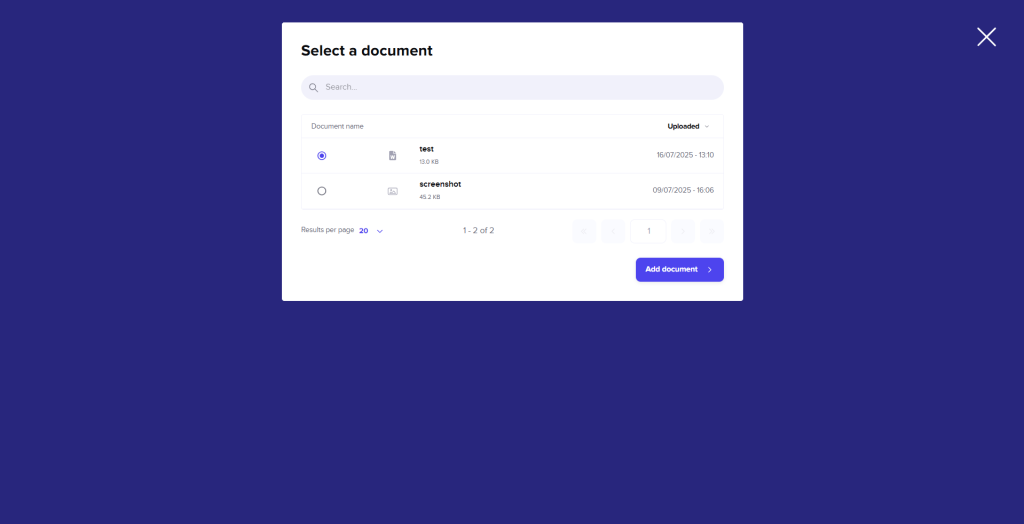
Documents (Only visible if you have access to My Documents)
Use this section to add your own external documents (PDF, PNG, XLSX, DOCX, etc.) to the newsletter. Select one of your documents (managed via ‘Documents’) and add it.
You can add an additional note, change the document, or remove the component entirely.
Graph (only visible if Analysis is available)
Add dynamic graphs here (see reports).
Save as template
You can save your newsletter as a template by clicking the arrow next to ‘Ready to publish’ and selecting ‘save as template’.
Give the template a name; you will find it afterwards under ‘Settings’ in the ‘Templates’ section. You can then use this template as a basis for your next newsletter.
Attention!
You can modify your templates in the “Edit settings” menu under Templates. Please note that any changes made directly within the newsletter editor apply only to the current newsletter and will not be saved for future use.
Edit settings
You can change the following settings at any time via ‘Edit Settings’:
- General: The newsletter logo + deleting the newsletter.
- Template
- Recipient: Update who receives the newsletter here.
- Publish date: Modify the publication date for this edition.
- Collaboration: Change the collaboration settings for this newsletter.
- Advanced (optional): For intranet integration (see below)
You can rearrange the blocks within a newsletter by using the ‘Edit order of content’ feature.
Publishing newsletters
Once the newsletter is ready, click ‘Publish now’ to send it. You will see an overview of the recipients, where you can still make any necessary changes. At the bottom, there is a checkbox labeled ‘Send e-mail to contacts’ (enabled by default). If you do not wish to send an email, uncheck this box; the recipients will not receive an email and will only be able to view the newsletter in their kiosk.
Next to ‘Publish now’, you will see a dropdown button. You can select this if you wish to schedule your newsletter for a later time or save it as a template.
Back to edit mode
Once a newsletter has been scheduled, you can always return to edit mode to make further changes.
Quick integration link newsletter (intranet etc)
If you would like an easy way to integrate all articles from a specific recurring newsletter into, for example, an intranet or a BI tool, you can use our Quick Integration Link feature. You can find this under ‘Newsletters – Edit settings – Advanced’. Clicking the button will generate a JSON feed that is easy to integrate.
Find more information on this here.